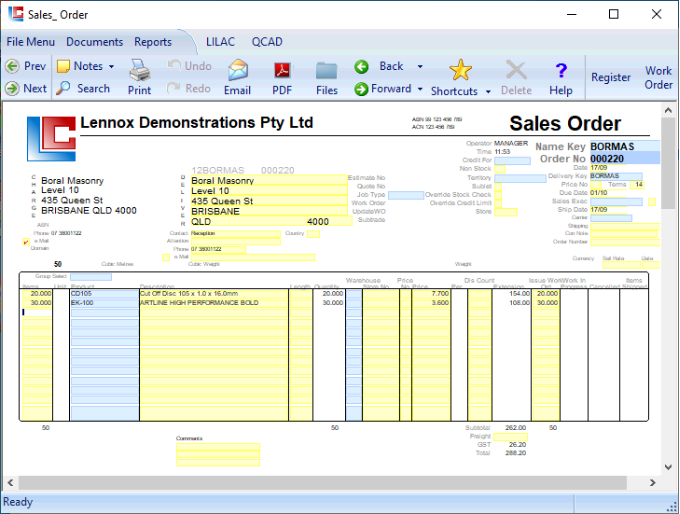
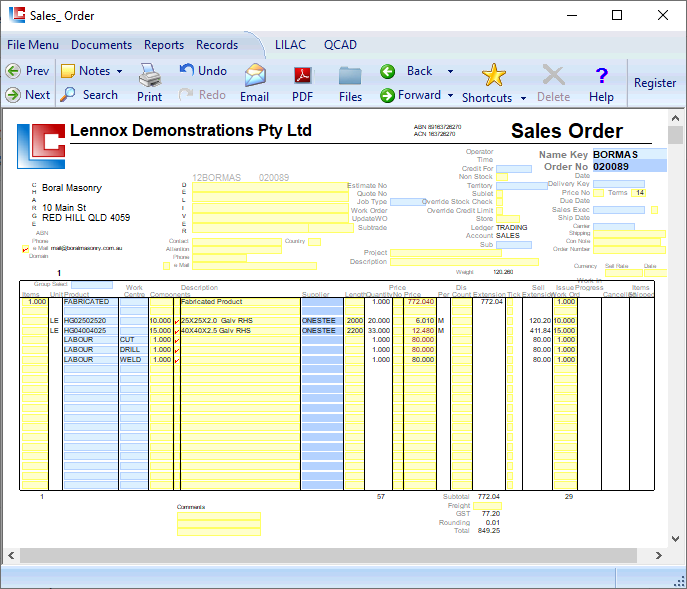
This document enables the user to create and modify a Sales Order. The Name Key and Order No together form the key to this document. The Sales Order is mandatory in the sequence of sales order processing, which may involve, Estimate -> Quotation -> Sales Order -> Work Order -> Tax Invoice. Use the buttons from the ribbon to invoke further processing when satisfied the Sales Order reflects the customers requirements.
1. Name Key
Right Mouse click, or F12, to select an established Debtor.
4. Processing (Work Order or Direct to Invoice)
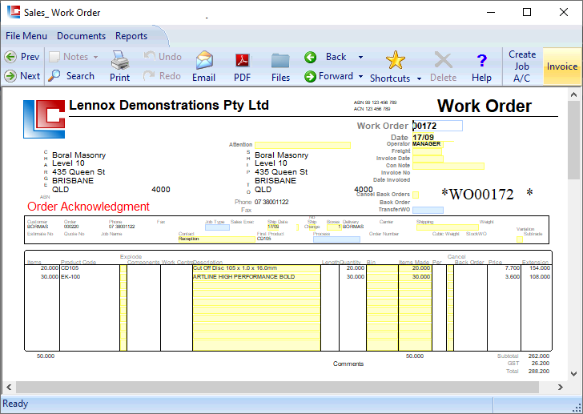
'Work Order' from the ribbon will generate a corresponding Work Order document, which may be used internally to build, manage, or pick the order prior to invoicing.
Issuing a Work Order registers products as on Customer Order and reduces Available for Sale in the Stock Account. (As does 'Register' from the ribbon).
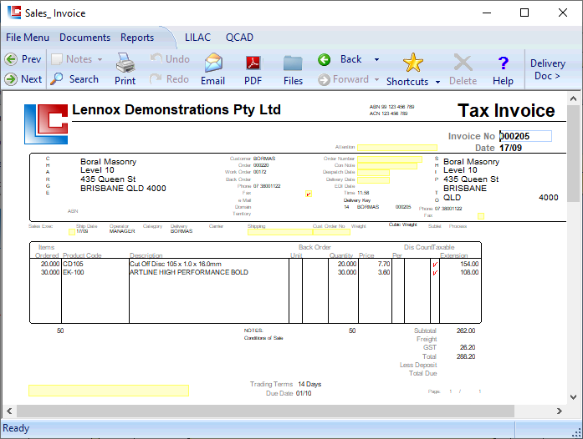
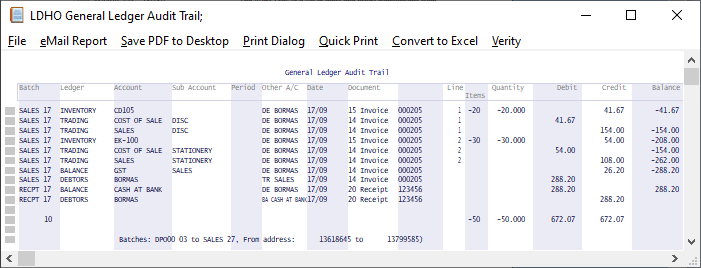
From the Work Order document, 'Invoice' from the ribbon is available to generate a Tax Invoice. It is only at Invoicing that financial accounting entries are posted.
*Direct to invoice is an option, meaning there is no Work Order document.
2. Order No
Striking ENTER to pass through the Order Number field to allocate a unique incremental Order No. Right click to search.
3. Sales Order body
Items, Product, etc, are entered in the body of the Sales Order.
Product Code: Enter text, Right Mouse, F12, or F5.
Quantity, Price, Extension.
A secondary Order Number Field is available for use if necessary, ie to input an order number provided by the Debtor.
Number of Items to be sold.
List and drill down to Sales Orders
Reports > Status > Sales Document Trail Reports > Status > Sales Orders Reports > Sales Analysis > Sales Order History Reports > Documents > Sales Orders
Sale Order Status
Columns indicate the status of a Sales Order line by line. - Issue Work Order -> Items yet to be progressed from the Sales Order - Work In Progress -> Items have progressed to Work Order - Cancelled -> Items Cancelled at Work Order Stage - Items Shipped -> Items have been Invoiced Where an invoice is reversed, the Sales Order will display original order entry, un-registered, and stock returned to pre invoice levels.
Edit Sales Order
Typically a Sales Order is edited before it is registered or progressed to Work Order or Invoice. In this case the order may be edited with the space bar, or 'Delete!', or 'Delete Line' from the ribbon with no impact on Customer Orders or Available for Sale in the Stock Account, where the order is not registered.
Delete
Where a Sales Order has been registered, using space bar to blank the Items should then be followed by 'Register' from the ribbon to un-register the Items. - 'Delete Line' will un-register an order line. Place the text cursor / caret in the line intended for deletion and click 'Delete Line' - 'Delete!' will delete the entire Sales Order and un-register all order lines. Place the text cursor / caret in the Order No field and click 'Delete!' Each of the delete buttons will un-register previously registered Items, also updating Customer Orders, Available for Sale in the Stock Account.
Sales Order
Page 2 Documents > Sales > Order
Register Customer Orders
- This figure shows Items within a Sales Order, currently un-registered. That is, not yet allocated for sale to a customer. - 'Register' or 'Work Order' from the ribbon will update the un-registered figure. Often resulting in un-registered becoming blank (zero), ie Items allocated for sale to a customer. - 'Register' or 'Work Order' will also update Customer Orders, and Available For Sale, in the Stock Account. - 'Register' is a non-essential option, ie it may be used where it is likely that a Sales Order would remain open / un-processed for a period of time.
- In the event that Items are 'Registered' ie a blank (zero) in the bold Register field, and, the user is required to un-register the Items, thus returning Customer Orders and Available for Sale in the Stock Account to a previous value (pre-registered value), the user may either blank the Items field, which will place a negative value in the bold register field, and click 'Register'. Or, Delete the entire line in question, by placing the caret in the line and clicking 'Delete Line' from the ribbon.
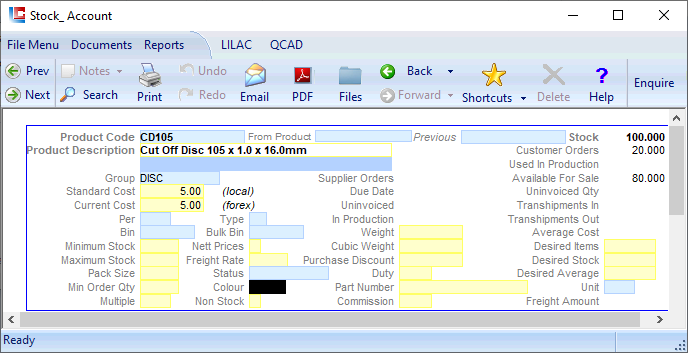
This image shows the result of 'Register' or Work Order' from the ribbon of the Sales Order for the product CD105. Stock (on hand) remains at 100, Customer Orders is increased from 0 to 20, and Available for Sale is reduced to from 100 to 80.
Further processing to Tax Invoice will result in Stock = 80, Customer Orders = 0, Available for Sale = 80.
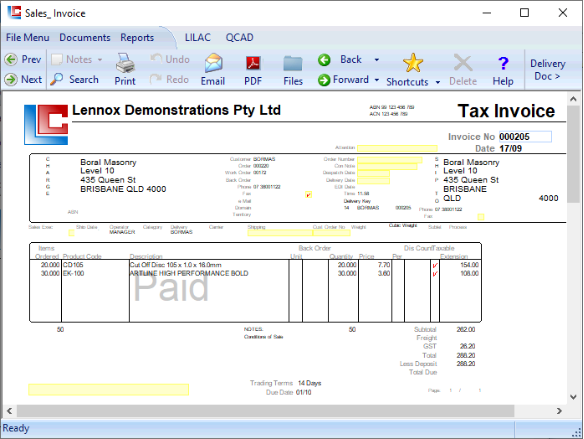
Work Order > Tax Invoice
Page 3 Documents > Sales > Order
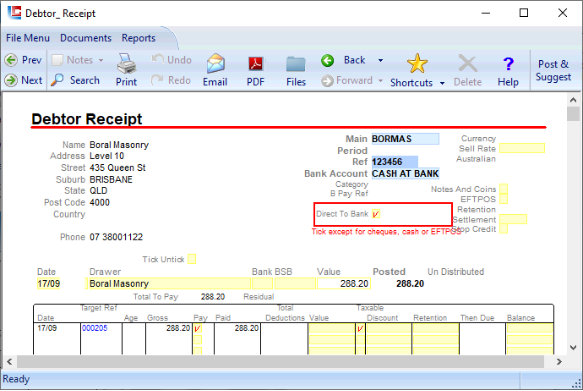
Debtor Receipt > Tax Invoice marked Paid
Page 4 Documents > Sales > Order
Sales Order
Page 5 Documents > Sales > Order
Purpose: Sale Order is the primary data entry document for processing sales. This document allows the user to create or modify a sales order for a customer. Changes at the Sales Order stage can be performed at any time. No accounting transaction takes place until the confirm Invoice stage.
Name Key: Type in the customers key (or click the right mouse button) and select the key from the list. Order No: Enter past this field to create a new order. Otherwise type in the order number (or click the right mouse button) and select the order number from the list. Date: Date the order was created. If a new order is being created, this field will be be set to the Working Date. Delivery Key: Type in the delivery key (or click the right mouse button) and select the key from the list. This will then change the Ship To details accordingly. This field will default to the delivery keys established in the Debtor > Account document. Price No: Type in the default price number to use for this sales order. The individual prices can be overridden on a line by line basis if needed. This will default to the price number established in the Debtor > Account. Terms: Trading Terms in Days Order Number: Type in the customers purchase order number if one has been provided. Otherwise this field can be left blank. Sales Exec: Type in the sales exec key (or click the right mouse button) and select the key from the list. Ship Date: Type in the expected ship date for this order. Carrier: Type in the carrier key (or click the right mouse button) and select the key from the list. Shipping: Shipping instructions. Weight: Displays the weight of the order in kilograms. Cubic Weight: This field is shown if the Show Cubic Weight field in the company data is set to Y. Displays the cubic weight for the order in meters cubed. Cubic KGS: This field is shown if the Show Cubic Weight field in the company data is set to Y. Displays the cubic weight for the order in KGs. This is calculated by the following formula Cubic Weight * Cubic Rate. The Cubic Rate for a Carrier can be established in the Parameters - Carriers document. Currency: Displays the currency for the customer. This field should be blank if referring to Australian dollars. Sell Rate: Type in the current sell rate of the customer's currency. This field should be left blank if referring to Australian dollars. Date: Type in the date the Sell Rate was last updated.
Items: Type in the number of items to be sold to the customer. If the the Qty Length Pairs is set to Y in the company data, leave this field blank. It will automatically be filled in once the Quantity Length pairs have been entered into the Description field. Unit: Displays the of measure which the stock is to be sold out at. Product: Type in the product’s key (or click the right mouse button) and select the key from the list. Description: Displays the product description from the product master record. If the the Qty Length Pairs is set to Y in the company data, type in the quantity length pairs in the format length/quantity length/quantity etc... Quantity: This field displays the quantity of the product to sell to the customer. Price No: This field is only shown if either the Timber Surcharges or the Sticky Prices is set to Y in the company data. If the Timber Surcharges field is set to Y this field will automatically be calculated from the Description field. Otherwise this field is set from either the Debtor > Account, or if the product field is blank, from the previous line. Price: Type in the price to sell the individual item for. This field will automatically be calculated from the Stock Account, using the price number for either the individual line (if available), or for the entire quote. Dis Count: Type in the percentage discount the customer is to receive for this line. Extension: Displays the unmarked up extension of the order line. This field is calculated using the following formula: - if Timber Surcharges ="Y" then Extension := rc((Quantity * (Price + Surcharge) * (100.0 - DisCount) / 100.0 + Freight)) else Extension := rc(Quantity * Price * (100.0 - DisCount) / 100.0)
Sub Total: This field displays the total of the Extension field for all the lines on the quotation. This may or may not include GST. Freight: The freight can be entered at the freight box. Type in the freight applicable to this shipment. If both Sales Exclude GST and the Prices Exclude GST features are blank type in the freight including GST else type it in excluding GST. Discount: This field is shown if the Invoice Discount field in the company data is set to Y. Displays the monetary discount applied to the order. GST: Displays the GST amount of the order. Total: Displays the GST inclusive amount to charge the customer.
Sales Order
Page 6 Documents > Sales > Order
Ribbon Buttons - Transaction Processing Description: Register: This button is only available if the Barcode Scanning feature setting is blank. Click this button to register the order with Customer Orders within the Stock Account. Otherwise / in normal processing, progressing to Work Order or Invoice performs this function automatically. Invoice: This field is shown if Direct Invoicing is set to Y in the company data. Click the Invoice button to turn the sales order into a Tax Invoice. Work Order: This field is not shown if Direct Invoicing is set to Y in the company data.
From Here: If Direct Invoicing is set to Y in the company data, click the Invoice button to generate an invoice. Other wise click the Work Order button to produce a work order.
Part Number: This field is only seen if the Part No Support feature setting is set to Y. Displays the part number that is associated with the product master record. Discount Rate: This field is shown if the Invoice Discount field in the company data is set to Y. Type in a percentage discount to apply to the whole order. If this feature is used, then GST amount shown on the Invoice, and the GST shown on the order can be out by a cent. Stop Credit: If this field is ticked, the customer is on stop credit. You will need to remove this from the Debtors - Account document before the order can be processed any further. Time And Materials: This field is shown if the Manufacturing Work Orders field in the company data is set to Y. This order is for a Time & Materials Job Itemise: This field is shown if the Manufacturing Work Orders field in the company data is set to Y. Want a itemised invoice. Create Serial Nos: This field is shown if the Manufacturing Work Orders and the Hydrapower fields in company data are set to Y. This will create the necessary number of serial numbers for each line on the order, and a corresponding checklist available via Stock - Check List. Serial numbers are only created for those products which are set up correctly in the Stock - Check List Template document. Subtotals Only: Only want to see sub-totals on invoice. Unregistered: Quantity not yet registered. Surcharge: This field is only shown if the Timber Surcharges is set to Y in the company data. Type in any surcharge that applies to this line. This will automatically be calculated from the Description field. Freight: This field is only shown if the Timber Surcharges is set to Y in the company data. Type in the freight to be applied to this line on the quotation. Metres: This field is only shown if the Qty Length Pairs is set to Y in the company data. This will show the total lineal metres entered in the Description field. Issue Work Ord: Type in the number of items to issue a work order for. Work In Progress: Displays the number of items in manufacture (Work Order but not yet invoiced) stage. Items Shipped: Displays the number of items which have been invoiced. To process credit notes, create a Sales Order with negative quantities, and go through the other two stages, i.e.: Work Order and confirming an Invoice, as usual. If automatic Serial Number generation is required, then check list templates should have been established via the Stock - Check List Template document.
SALES ORDER EDI
1. Acquire XML - Create order lines in a Sales Order from XML data. Begining with a blank Sales Order (no key necessay) *Acquire XML will open a module, from this module Open XML File or Drag and Drop the XML file into this module. The XML file to be acquired must be formatted according to the schema found at http://www.lennox.com.au/LILAC_XML_Ordering.verity
2. Acquire XML may be used in conjuntion with WinSCP SFTP Client available at http://www.lennox.com.au/LILAC_Supported_Software.verity. This facilitates the downloading of Sales Order XML files from another sever.
3. SPS XML ORD - SPS Commerce. Create order lines in a Sales Order from XML data
4. SPS XML ACK - SPS Commerce. Create order acknowledgement XML data
Sales Order - Components
Page 7 Documents > Sales > Order
SALES ORDER - COMPONENTS COLUMN - PRODUCT FABRICATION WITHIN SALES ORDER PROCESSING
1. The components column within Sales Order Processing allows products from the Stock Account to be included, and selling prices accumulated, for a fabricated or “put together” product that does not have a standard / static Bill of Materials. That is, the components column allows dynamic / non-standard components entry.
2. Select the product which will contain components. This product should be marked Non Stock (within Stock Account document), meaning there are no COGS or Inventory postings associated with the invoicing of this product, as COGS and inventory postings are associated with the components, which make up the FABRICATED product. (FABRICATED could be used as the Product Code marked as Non-Stock).
3. Beneath the FABRICATED product, list the component products to be included, entering the number of the component products in the Component column and placing a tick in the field provided to the right of the Components column.
4. The extension for the FABRICATED product containing the components will accumulate the component costs.
A tick in this column for selected line(s), displays the selected line(s), in a report version by clicking 'Pro-forma Invoice' from the ribbon. Restricting content is provided to control visibility for potential customer viewing. Lines above the top most tick will be displayed. Inserting a blank line with a tick in the first line of the document, can act as a marker, preventing any lines from being displayed.